Multifield Component in Sightly with Sling Models

Starting AEM 6.0, new templating language Sightly now known as HTL is introduced. It offers highly productive enterprise-level web framework that increases security and allows HTML developers without Java knowledge to better participate in AEM projects.

Adobe recommends any new components to be developed using Sightly. Speaking of components, one of the vital components of any AEM application is a multifield component. More often than not, you will come across a requirement where you would have to create a multifield component, be it a social link component or a custom carousel component etc.  This post will talk about creating a multifield component in Sightly using Sling Models.

Infrastructure Used:

  • AEM Instance : 6.2
  • OS: Windows 10

Follow the below Steps to create the multifield component:

  1. Firstly Create a sample AEM project using the maven archetype 10.
  2. Create a new Sightly component. You can take reference from this article. Create the structure like below for multifield componentmultifield 
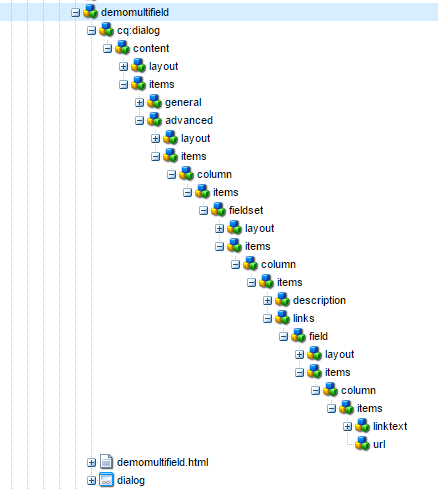
(I would be sharing the complete code, don’t worry).
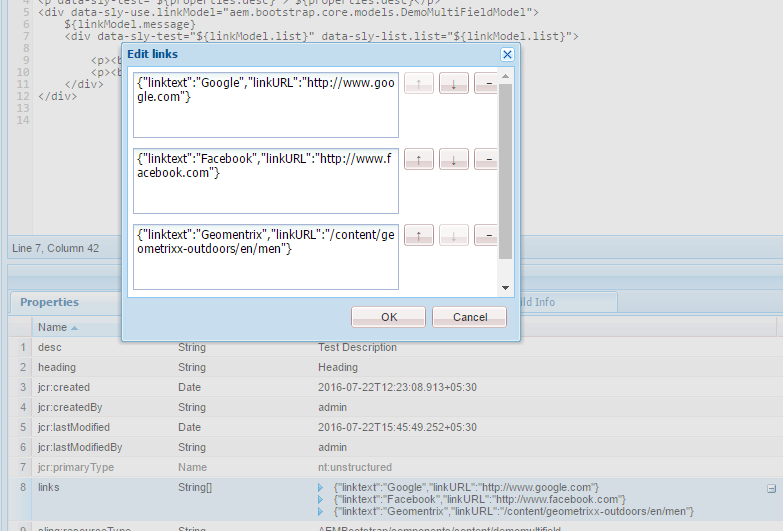
  3. The links get saved in the below format.links
  4. Write a Sling Model to parse these links. Read my earlier post about the issue with sling models in 6.2.
</pre>
<pre>@Model(adaptables = Resource.class)
public class DemoMultiFieldModel {

    Logger logger = LoggerFactory.getLogger(DemoMultiFieldModel.class);

    @Inject
    @Named("links")
    private String[] links;

    private List<Link> list;

    @PostConstruct
    protected void init() throws JSONException {
        logger.info("links" + links);
        this.list = new ArrayList<Link>();
        for (String linkString : links) {
            JSONObject jsonObject = new JSONObject(linkString);
            logger.info("json object is " + jsonObject);
            list.add(new Link(jsonObject.getString("linktext"), jsonObject.getString("linkURL")));
        }
        logger.info("linkList is" + list);
    }

    public List<Link> getList() {
        return list;
    }
}</pre>
<pre>
  1.  Now, invoke this model in your Sightly file.
Demo MultifieldPanel component
<p data-sly-test="${properties.heading}"> ${properties.heading}</p>
<p data-sly-test="${properties.desc}"> ${properties.desc}</p>

<div data-sly-use.linkModel="aem.bootstrap.core.models.DemoMultiFieldModel">
${linkModel.message}
<div data-sly-test="${linkModel.list}" data-sly-list.list="${linkModel.list}">
<b>page:</b> ${list.linktext}
<b>path:</b> ${list.linkURL}
</div>
</div>
  1. You also have to add the nested-multifield.js since nested multifield is not supported OOTB. You can find it in the code repository below.

If everything is fine, your sightly component should look like below:

sightly page

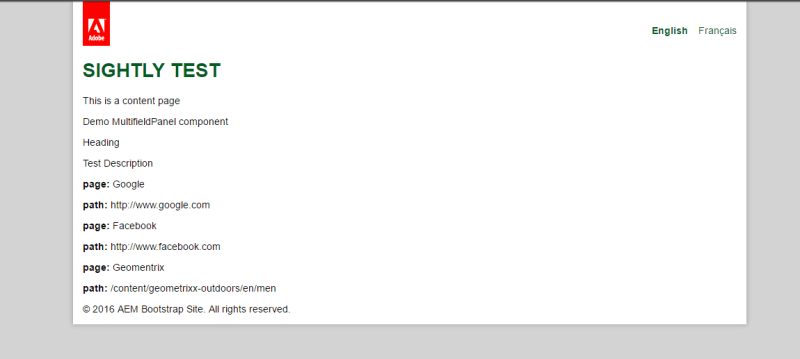
You can clone the code from here.

References :

https://helpx.adobe.com/experience-manager/using/creating-sightly-component.html

https://sling.apache.org/documentation/bundles/models.html

https://helpx.adobe.com/experience-manager/using/domparser.html

Hope it helps !! 🙂

Advertisement

Creating Custom Node Type in JCR

In this blogpost, I’ll talk about the various ways of creating the Custom Node Type and deploying it across multiple instances. We’ll be using AEM 5.6.1 as our CQ server.

A. Creating and Registering the Custom Nodetype 

There are broadly following three ways of creating custom node types.

  1. Using Node Type Administration console.
  2. Programmatically
  3. Using Package Manager

We’ll discuss them one by one :

  1. Using Node Type Administration Console 
  • Using CND files.

The Compact Namespace and Node Type Definition (CND) notation provides a compact standardized syntax for defining node types and making namespace declarations. The notation is intended both for documentation and for programmatically registering node types. Existing documentation can be followed for creating the CND file.

Go to Node Type Administration console, click on Import  Node Type, copy/paste the CND file in the textarea, keep “Automatically register nodetype” checkbox and “Automatically register defined namespaces” checked. Click on submit and your custom node type will be registered.

  • Without using CND files

Go to Node Type Administration console,click on Create Node Type and enter the details about Node Name , child Node defintions , property definitions , supertypes etc. Click on the [Register Node Type] link at the bottom of the page to register this newly created Node type. Check the nodetype in Node type Administration console.

2. Programmatically

We can register the nodetype programmatically as well.

  • Using CND file.

We can use JCR Commons CndImporter to register it. Following is the code snippet to regsiter it. Create a CND file say nodetypes.cnd having the definition of the new node type. Make this file as a part of the bundle.

  • Without using CND file.

We can use JCR API to create a new node type and register it. Following is the code snippet to register it.


session = slingRepository.loginAdministrative(null); 

NodeTypeManager manager = (NodeTypeManager)session.getWorkspace().
getNodeTypeManager();
NamespaceRegistry ns=session.getWorkspace().getNamespaceRegistry();
ns.registerNamespace("cp","https://codepearlz.wordpress.com/CustomNode");

// Create node type
NodeTypeTemplate nodeTypeTemplate = manager.createNodeTypeTemplate();
nodeTypeTemplate.setName("cp:testNodeType");
// Create a new property PropertyDefinitionTemplate
customProperty1 = manager.createPropertyDefinitionTemplate();
customProperty1.setName("cp:Name");
customProperty1.setRequiredType(PropertyType.STRING); PropertyDefinitionTemplate
customProperty2 = manager.createPropertyDefinitionTemplate();
customProperty2.setName("cp:City");
customProperty2.setRequiredType(PropertyType.STRING);
// Add property to node type
nodeTypeTemplate.getPropertyDefinitionTemplates().add(customProperty1);
nodeTypeTemplate.getPropertyDefinitionTemplates().add(customProperty2);
/* Register node type */
manager.registerNodeType(nodeTypeTemplate, true); session.save();

3. Using Package Manager

We can register node type via package manager as well . In Package Manager, upload a CQ package containing custom nodetypes.cnd  and install it. Check that the custom nodetypes are registered in Node Type Administration console.

Troubleshoot : 

    • After registering the nodetype, make sure it is visible in Node Type Administration console. If not registered, check the error.log for more insight.
    • CND file should be in proper format to avoid unwanted errors.
    • Java 7 introduced a stricter verification and changed the class format a bit — to contain a stack map, used to verify that code is correct. If you are using java 7, pass these parameter -XX:MaxPermSize=512m -Xmx1520m -XX:-UseSplitVerifier while starting the instance from command line. Refer this link for more details.

B. Deploying the Custom Nodetype across multiple instances

If we have enabled clustering, then our multiple author and publish instances will be running on separate machines. We would want the new node type to be visible in all the instances. It can be  done via two ways :

  1. If we are programmatically registering the new node type, then deploying the bundle will simply make it visible across all the instances.
  2. Whenever a new node type gets registered in repository, three files gets updated . custom_nodetypes.xml at <CQ author instance directory>/crx-quickstart/repository/repository/nodetypes  will contain the definition of new node type. ns_idx.properties and ns_reg.properties at <CQ author instance directory>/crx-quickstart/repository/repository/namespaces will have the details of the new namespaces added. Copy/Pasting these files to all the instances at the specified location will make it visible. Note that this will require an instance restart.

Hope it helps !! 🙂