Communities Component Guide

Adobe has provided one of the most useful feature/utility for developing communities components, known as Communities Component Guide. It is an interactive development tool for the Social Component Framework (SCF). It provides a list of available communities components and complex features built of community components.

Apart from providing the basic information for each component, it lets you experiment with the features as well. You can access the community guides on your instance by following the below URL

http://<server>:<port>/content/community-components/en.html.

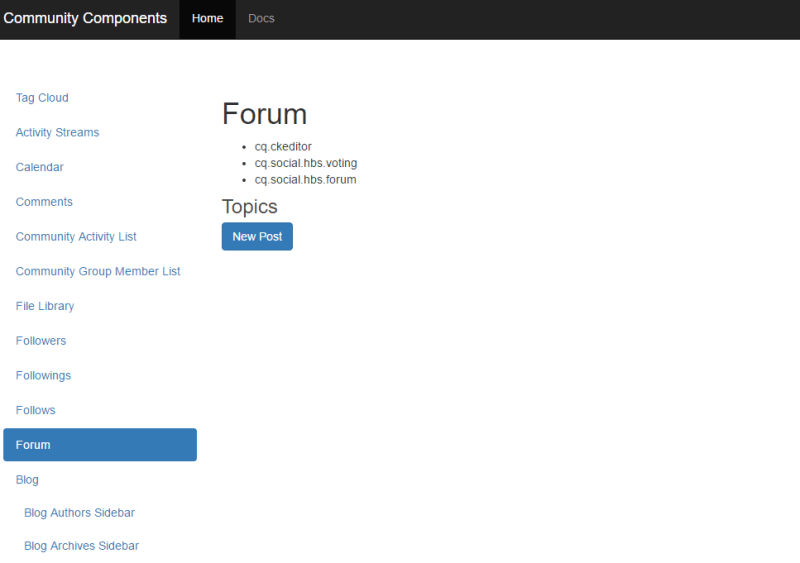
The left rail provides the list of the SCF components. Clicking on the component will display the information related to that component. e.g.

  • You should be able to see the title of the component.
  • Clientlibs are very important when it comes to community components. Your component might not behave correctly if the required clientlibs are not included on the page. You should be able to see the required clientlibs for the selected component.
  • It also has the instance of the component on the page so that you can experiment with it. The behavior of the component depends on the instance where you are accessing the guide from. If you are accessing it on the author, then you should be able to see the dialog, can edit the template scripts etc. If you are accessing it on publish then you should be able to experience the features as a site visitor.

It looks like below:

component-guide

Customization:

If you want to do some customizations on the fly, the scg:showIde property must be added to the component page’s content JCR node and set to true.

Lets’ take an example of the comments component:

  1. Go to CRXDE Lite e.g. http://<server>:<port>/crx/de
  2. Select the component’s jcr:content node e.g. /content/community-components/en/comments/jcr:content
  3. Add below property and save.
    • Name  scg:showIde
    • Type   String
    • Value  truecomments-comp
  4. Reload the Comments page in the guide. You should be able to see 3 more tabs.
    http://<server>:<port>/content/community-components/en/comments.html

comments-comp-edit

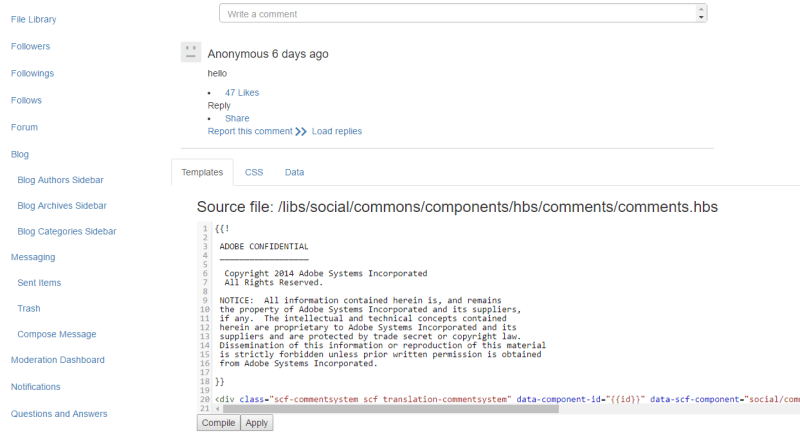
  • Template Tab: It lets you see the template associated with the component. You can make changes to it, compile and see the results on the screen. Nothing will be saved in the repository.
  • CSS Tab: It lets you modify the CSS and see the changes on the component placed on the page.
  • Data Tab: To modify the.social.json associated with the component.

If you are a beginner and trying your hands with AEM communities, this will surely help you.

Hope it helps !! 🙂


Advertisement

Multifield Component in Sightly with Sling Models

Starting AEM 6.0, new templating language Sightly now known as HTL is introduced. It offers highly productive enterprise-level web framework that increases security and allows HTML developers without Java knowledge to better participate in AEM projects.

Adobe recommends any new components to be developed using Sightly. Speaking of components, one of the vital components of any AEM application is a multifield component. More often than not, you will come across a requirement where you would have to create a multifield component, be it a social link component or a custom carousel component etc.  This post will talk about creating a multifield component in Sightly using Sling Models.

Infrastructure Used:

  • AEM Instance : 6.2
  • OS: Windows 10

Follow the below Steps to create the multifield component:

  1. Firstly Create a sample AEM project using the maven archetype 10.
  2. Create a new Sightly component. You can take reference from this article. Create the structure like below for multifield componentmultifield (I would be sharing the complete code, don’t worry).
  3. The links get saved in the below format.links
  4. Write a Sling Model to parse these links. Read my earlier post about the issue with sling models in 6.2.
</pre>
<pre>@Model(adaptables = Resource.class)
public class DemoMultiFieldModel {

    Logger logger = LoggerFactory.getLogger(DemoMultiFieldModel.class);

    @Inject
    @Named("links")
    private String[] links;

    private List<Link> list;

    @PostConstruct
    protected void init() throws JSONException {
        logger.info("links" + links);
        this.list = new ArrayList<Link>();
        for (String linkString : links) {
            JSONObject jsonObject = new JSONObject(linkString);
            logger.info("json object is " + jsonObject);
            list.add(new Link(jsonObject.getString("linktext"), jsonObject.getString("linkURL")));
        }
        logger.info("linkList is" + list);
    }

    public List<Link> getList() {
        return list;
    }
}</pre>
<pre>
  1.  Now, invoke this model in your Sightly file.
Demo MultifieldPanel component
<p data-sly-test="${properties.heading}"> ${properties.heading}</p>
<p data-sly-test="${properties.desc}"> ${properties.desc}</p>

<div data-sly-use.linkModel="aem.bootstrap.core.models.DemoMultiFieldModel">
${linkModel.message}
<div data-sly-test="${linkModel.list}" data-sly-list.list="${linkModel.list}">
<b>page:</b> ${list.linktext}
<b>path:</b> ${list.linkURL}
</div>
</div>
  1. You also have to add the nested-multifield.js since nested multifield is not supported OOTB. You can find it in the code repository below.

If everything is fine, your sightly component should look like below:

sightly page

You can clone the code from here.

References :

https://helpx.adobe.com/experience-manager/using/creating-sightly-component.html

https://sling.apache.org/documentation/bundles/models.html

https://helpx.adobe.com/experience-manager/using/domparser.html

Hope it helps !! 🙂

Managing Community Users in AEM | Tunnel Service

The trend of having the interactive websites is more common these days. Users can interact through forums, by posting comments, by participating in quizzes etc. AEM Communities provides a rich framework to have such interactive websites. Users can either come from LDAP/AEM or you can allow Social logins as well. But, with this increases the need of managing such users in a highly interactive website.

Recently, we encountered a serious issue in one of our projects.

Problem/Use Case: 

Usually, the logins happen on a Publish instance which makes the users being created on the Publish instance itself. Now, in an interactive community site, users are added to Community Groups so that they can interact. Now, there are two options to add these users to the groups:

  1. Have some trusted users who can use the useradmin console and assign the users to the particular Community groups.Users who gets assigned to such community groups are called members on the publish instance.
  2. Have the same users on author instance, add them to appropriate Community groups and activate it.

Now, the first option imposes some of the security risks, so we were using the 2nd option. But lately, we realized that as the number of users increases the performance of author instance starts degrading.

Solution:

Adobe has provided a way to have these users in the publish instance and yet manage it from the author instance. You can use the tunnel service to have the publish users available in the author instance. Follow the below steps:

  1. Go to Configuration Manager on author instance and look for the AEM Communities Publish Tunnel Service  and click on enable. This service needs to be enabled on the author instance only.tunnel service
  2. Now, Go to the members console on author instance. You should be able to see all the users now. members console
  3. Clicking on create button will allow you to add a new member into the publish instance and assign it to particular Community Site and Community Groups.
  4. Similarly, Groups console will allow you to manage the Community Groups.

Troubleshooting:

  1. Make sure both the author and publish instance will have the same configuration i.e. Both should be on AEM 6.1 (SP1+FP4) or above. In FP3, tunnel service does not allow the management of members from author instance. This feature was added in FP4.
  2. Make sure the bundles are up and running in both the instances. Otherwise,you will not be able to see any users in the members console.
  3. If you are not able to see the default users, make sure you are not running on nosamplecontent runmode.

References:

https://docs.adobe.com/docs/en/aem/6-1/administer/communities/users.html

https://docs.adobe.com/docs/en/aem/6-1/administer/communities/consoles/members.html

Hope it helps !! 🙂

Creating Custom Node Type in JCR

In this blogpost, I’ll talk about the various ways of creating the Custom Node Type and deploying it across multiple instances. We’ll be using AEM 5.6.1 as our CQ server.

A. Creating and Registering the Custom Nodetype 

There are broadly following three ways of creating custom node types.

  1. Using Node Type Administration console.
  2. Programmatically
  3. Using Package Manager

We’ll discuss them one by one :

  1. Using Node Type Administration Console 
  • Using CND files.

The Compact Namespace and Node Type Definition (CND) notation provides a compact standardized syntax for defining node types and making namespace declarations. The notation is intended both for documentation and for programmatically registering node types. Existing documentation can be followed for creating the CND file.

Go to Node Type Administration console, click on Import  Node Type, copy/paste the CND file in the textarea, keep “Automatically register nodetype” checkbox and “Automatically register defined namespaces” checked. Click on submit and your custom node type will be registered.

  • Without using CND files

Go to Node Type Administration console,click on Create Node Type and enter the details about Node Name , child Node defintions , property definitions , supertypes etc. Click on the [Register Node Type] link at the bottom of the page to register this newly created Node type. Check the nodetype in Node type Administration console.

2. Programmatically

We can register the nodetype programmatically as well.

  • Using CND file.

We can use JCR Commons CndImporter to register it. Following is the code snippet to regsiter it. Create a CND file say nodetypes.cnd having the definition of the new node type. Make this file as a part of the bundle.

  • Without using CND file.

We can use JCR API to create a new node type and register it. Following is the code snippet to register it.


session = slingRepository.loginAdministrative(null); 

NodeTypeManager manager = (NodeTypeManager)session.getWorkspace().
getNodeTypeManager();
NamespaceRegistry ns=session.getWorkspace().getNamespaceRegistry();
ns.registerNamespace("cp","https://codepearlz.wordpress.com/CustomNode");

// Create node type
NodeTypeTemplate nodeTypeTemplate = manager.createNodeTypeTemplate();
nodeTypeTemplate.setName("cp:testNodeType");
// Create a new property PropertyDefinitionTemplate
customProperty1 = manager.createPropertyDefinitionTemplate();
customProperty1.setName("cp:Name");
customProperty1.setRequiredType(PropertyType.STRING); PropertyDefinitionTemplate
customProperty2 = manager.createPropertyDefinitionTemplate();
customProperty2.setName("cp:City");
customProperty2.setRequiredType(PropertyType.STRING);
// Add property to node type
nodeTypeTemplate.getPropertyDefinitionTemplates().add(customProperty1);
nodeTypeTemplate.getPropertyDefinitionTemplates().add(customProperty2);
/* Register node type */
manager.registerNodeType(nodeTypeTemplate, true); session.save();

3. Using Package Manager

We can register node type via package manager as well . In Package Manager, upload a CQ package containing custom nodetypes.cnd  and install it. Check that the custom nodetypes are registered in Node Type Administration console.

Troubleshoot : 

    • After registering the nodetype, make sure it is visible in Node Type Administration console. If not registered, check the error.log for more insight.
    • CND file should be in proper format to avoid unwanted errors.
    • Java 7 introduced a stricter verification and changed the class format a bit — to contain a stack map, used to verify that code is correct. If you are using java 7, pass these parameter -XX:MaxPermSize=512m -Xmx1520m -XX:-UseSplitVerifier while starting the instance from command line. Refer this link for more details.

B. Deploying the Custom Nodetype across multiple instances

If we have enabled clustering, then our multiple author and publish instances will be running on separate machines. We would want the new node type to be visible in all the instances. It can be  done via two ways :

  1. If we are programmatically registering the new node type, then deploying the bundle will simply make it visible across all the instances.
  2. Whenever a new node type gets registered in repository, three files gets updated . custom_nodetypes.xml at <CQ author instance directory>/crx-quickstart/repository/repository/nodetypes  will contain the definition of new node type. ns_idx.properties and ns_reg.properties at <CQ author instance directory>/crx-quickstart/repository/repository/namespaces will have the details of the new namespaces added. Copy/Pasting these files to all the instances at the specified location will make it visible. Note that this will require an instance restart.

Hope it helps !! 🙂

Debugging in AEM

While working on one of a complex requirements in our project, we felt the need to continuously analyze the flow. Though, logs are of good help but we wanted to analyze the complete flow . In this scenario, debugging feature in IDE becomes very handy. Software Stack being used : 

  • CQ Server : AEM 5.6.1
  • IDE : IntelliJIdea 12.0

First We need to start our CQ instance in debug mode. We can do so by starting the AEM in debug mode by running the following command :

 java -jar cq5-author-4502.jar -fork -forkargs -- -Xdebug -Xrunjdwp:transport=dt_socket,address=59865,suspend=n,server=y -Xmx1520m -XX:MaxPermSize=512m -XX:-UseSplitVerifier 

We need to first open the socket from where all the JVM communication will happen. We need to specify the port number while starting the instance. Socket specifies the entry point for all the communication that happens in JVM. Every communication will happen via Socket. In above command, address=59865  is creating the socket for us. In IDE, we need to setup a remote connection for CQ and specify the same port no as mentioned while starting CQ. Follow the below steps to setup a remote connection in IntelliJIdea.

  1. Go to Run panel (top of the window) and select Edit configuration.
  2. Select Defaults and click on “+” to add new configuration. List of all the options will appear. Select “Remote”  from that list.
  3. Enter the details in the window as per your need. Specify the same port number which was used while starting the CQ instance in debug mode.
  4. Click on “OK” to save the configuration.

Below is the screenshot for the reference.

debug

Add breakpoints in the java files which you want to debug by double clicking on the line and start newly created configuration in Debug mode.

Troubleshooting :

1. While starting the AEM instance, make sure JVM has enough heap size for running CQ server, otherwise it will fork the JVM and parameters will not be passed to the forked jvm. Use -fork -forkargs – option to ensure that the command line parameters gets passed to the jvm.

2. If you are using java 7 , make sure to specify the -XX:-UseSplitVerifier parameter to avoid the unwanted strict verification errors while debugging the bundle.

Hope it helps !! 🙂