Managing Community Users in AEM | Tunnel Service

The trend of having the interactive websites is more common these days. Users can interact through forums, by posting comments, by participating in quizzes etc. AEM Communities provides a rich framework to have such interactive websites. Users can either come from LDAP/AEM or you can allow Social logins as well. But, with this increases the need of managing such users in a highly interactive website.

Recently, we encountered a serious issue in one of our projects.

Problem/Use Case: 

Usually, the logins happen on a Publish instance which makes the users being created on the Publish instance itself. Now, in an interactive community site, users are added to Community Groups so that they can interact. Now, there are two options to add these users to the groups:

  1. Have some trusted users who can use the useradmin console and assign the users to the particular Community groups.Users who gets assigned to such community groups are called members on the publish instance.
  2. Have the same users on author instance, add them to appropriate Community groups and activate it.

Now, the first option imposes some of the security risks, so we were using the 2nd option. But lately, we realized that as the number of users increases the performance of author instance starts degrading.

Solution:

Adobe has provided a way to have these users in the publish instance and yet manage it from the author instance. You can use the tunnel service to have the publish users available in the author instance. Follow the below steps:

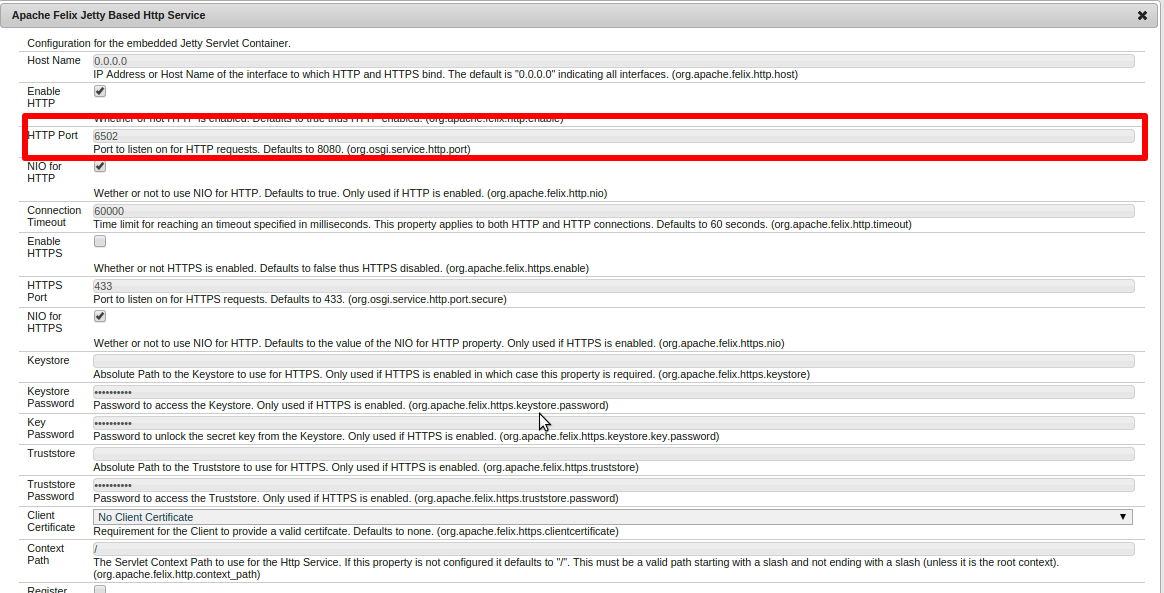
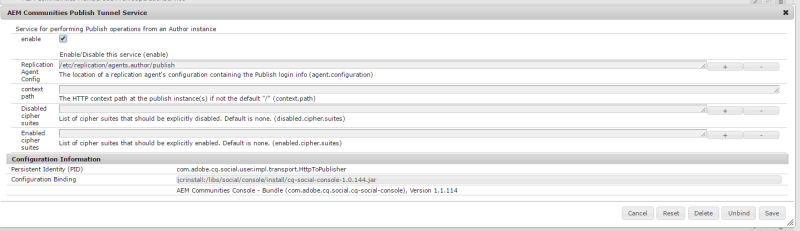
  1. Go to Configuration Manager on author instance and look for the AEM Communities Publish Tunnel Service  and click on enable. This service needs to be enabled on the author instance only.tunnel service
  2. Now, Go to the members console on author instance. You should be able to see all the users now. members console
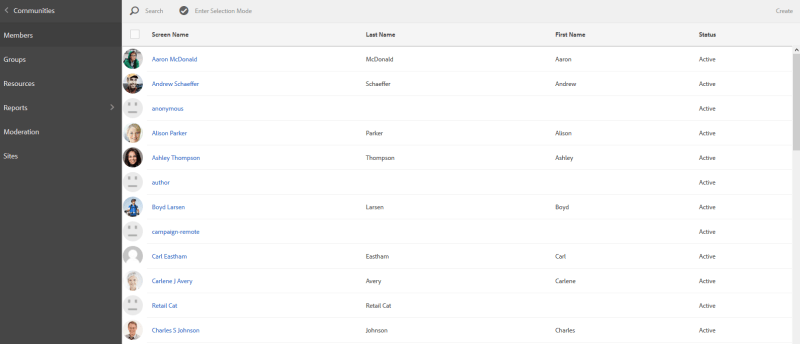
  3. Clicking on create button will allow you to add a new member into the publish instance and assign it to particular Community Site and Community Groups.
  4. Similarly, Groups console will allow you to manage the Community Groups.

Troubleshooting:

  1. Make sure both the author and publish instance will have the same configuration i.e. Both should be on AEM 6.1 (SP1+FP4) or above. In FP3, tunnel service does not allow the management of members from author instance. This feature was added in FP4.
  2. Make sure the bundles are up and running in both the instances. Otherwise,you will not be able to see any users in the members console.
  3. If you are not able to see the default users, make sure you are not running on nosamplecontent runmode.

References:

https://docs.adobe.com/docs/en/aem/6-1/administer/communities/users.html

https://docs.adobe.com/docs/en/aem/6-1/administer/communities/consoles/members.html

Hope it helps !! 🙂

Advertisement

Automating Content Migration Using Talend

Redevelopment of a website is often triggered because of three major factors:

  • The current website is built on the technology stack which is now obsolete.
  • Redesigning/Revamping the existing website, either to address the weaknesses in the current system or to add significant features.
  • Switching to a new technology platform, such as a new Content Management System (say AEM).

Often these factors are coupled together, selecting the new technology platform combined with redesigning the existing site. Identification of the new technology platform is a difficult task and subject to various factors like budget, feasibility, stability of the new technology stack, maintenance support, time to market etc. No matter what that choice is, more often than not gives birth to migration projects. An organization that has thousands of Pages, Articles, Assets etc would want to retain that data rather than creating everything from scratch. Migration has a very wide scope, but this blog post will talk about Content Migration.

Content Migration is a process of migrating the existing Digital Media of an organization to the new System. Being involved in various Content Migration Projects, I can say that this is not a simple process.

A change in technology platforms makes the migration challenging, as does a major restructure or redesign of the site.

Content Migration can be achieved by either of the following two ways or sometimes combined:

  1. Manual: Ctrl+C and Ctrl+V are the favorite keyboard shortcuts for every developer. The manual way is always the easiest yet the most painful one. If it is about a few pages, you might want to copy the content from the old site and paste into the new publishing tool. But, if the old system contains thousands of pages, would you want to follow that route? Maybe you can hire a team of content authors who’ll do the job for you. But a manual process is error-prone.
  2. Automated: Option of automating the entire process of migration is clearly an appealing one. Using some tool/methodology where you can define the rules for the migration process. This requires little or no manual effort. Talend Open Studio (ETL tool) is one such tool which can be used to automate the content migration process . You can refer Talend Open Studio Reference Guide for better understanding of the tool.

There are three basic requirements for migration:

  1. The input export of the existing content. It can be in any form e.g. Delimited Text file, XML file etc depending on the existing system.
  2. The output format i.e. What should be the end result of the migration process? Which data from the existing system should map to the new system (AEM in our case)? You should be clear with all the mapping and transformation rules specific to the new system. As we are dealing with migration to AEM, then we need to define the mappings between the existing content and AEM components. For instance, if the input extract received is an XML file then you would have to define the mappings among XML tags and the properties of an AEM component.
  3. Loading Mechanism which defines how the content gets loaded into the target System. This is a very important part as whole migration process will be designed based on the method of load. We’ve chosen the approach of creating a valid CQ Package which can be installed from CRX package manager. One of the major advantages of using this approach is that we can easily rollback and uninstall the package.

A basic migration job created using Talend looks like as follows:

main job.png

Each block in the above picture is a component, tRunJob in this case which calls another sub-job. The connectors between two such blocks define the transition i.e. how and when do we want the next block to be executed. In this case, these transitions are called as triggers.

This main job consists of four sub-jobs. Purpose of each sub-job is explained below:

  1. Pre-migration Cleanup: This job reads the input content (say XML) and breaks it into smaller manageable chunks (multiple XML files) which can be worked upon individually. The job can be modified to handle scenarios like Internal URL mapping, resolving the character encoding issues, define any tag mapping rules etc.
  2. Extraction & Transformation: This job reads the XMLs created in the previous step one by one, transforms it to AEM specific .content.xml schema and stores it under the required jcr_root hierarchy on the file system.
  3. Post Migration Cleanup:  This job is required if there are any post-migration cleanups that need to be done.
  4. Packaging: This is the final step of migration which creates the archive of the pages migrated in the above steps. Keep in mind that the package needs to be AEM compatible i.e. it should contain jcr_root & META_INF folder and associated metadata properties as per AEM packaging standard.

Content Migration is an important activity in redevelopment of a website and it needs proper planning. While you can automate the migration process but it will always require human eyes to approve the migrated content.

Hope this helps !! 🙂

Changing the Port of a Running AEM Instance

AEM derives the port number from the quickstart jar file. As the documentation says that by renaming the jar file, we can configure AEM to run on a different port.

But this requires an instance shutdown. What if we want to change the port number of a running AEM instance? What if it is an e-Commerce site and shutting down the server means the loss of customers which implies the loss of business? This blog post will talk about how to change the port of a running AEM instance.

Use case:

In a production AEM environment, we access the AEM instance through a web server, typically Apache Web Server. Dispatcher module that sits on Apache communicates to the AEM server. An end-user is oblivious to the fact that an AEM server even exists? But if there is a vulnerability in your application which could be exploited through the port it is running on, then a potential hacker can take advantage of it and cause serious security problems by reaching the server through that port.It is always recommended that we should change the default port. Though, it is hidden that which port the AEM server is running on but what if a hacker gets that information? A production system needs to change the port in that case. Changing the port in the usual way requires downtime. And Downtime can have serious impacts.

Resolution:

With AEM 6 onwards, we can change the port of a running AEM instance. Go to Felix Console and search for Apache Felix Jetty Based Http Service.

jetty-service

Change the default value of HTTP Port (highlighted above) with the new port number and hit Save. As soon as you save the configuration, the AEM will start running on the new port. To verify if the configuration works, reload the page. It will not open up. Now, open the same page with the new port specified in the above configuration. You will see that the AEM is running on the new port.

Hope it helps !! 🙂